
I’ve noticed that deploying SD-WAN controllers come with special treatment. Working your way through it and deploying more config than needed could result in controllers not being added to vManage or being unable to get the Overlay network up.
If you keep it to a specific order everything will work out fine.
Topics that I will cover:
- Testlab design
- Loading up the controller configurations
- Installing certificates
- Sign CSR’s
- Install signed certificates to vManage
- Enable Controller communications
- References
:: Testlab design
| Device | Version | Description |
| 2x Layer-3 Core switch | i86bi_LinuxL2-AdvEnterpriseK9-M_152 | Route between VPN0 and VPN512 |
| Layer-2 switch | vios_l2-ADVENTERPRISEK9-M Version 15.2(CML_NIGHTLY_20180510)FLO_DSGS7 | Switch for VPN0 |
| Enterprise CA | Ubuntu server 18.04 | Root CA |
| vManage | 18.4.302 | Management Plane |
| vBond | 18.4.302 | Orchestration Plane |
| vSmart | 18.4.302 | Control Plane |
| vEdge | 19.2.099 | WAN CPE |
Note: You can also use the vManage and the vShell to setup a enterprise CA.
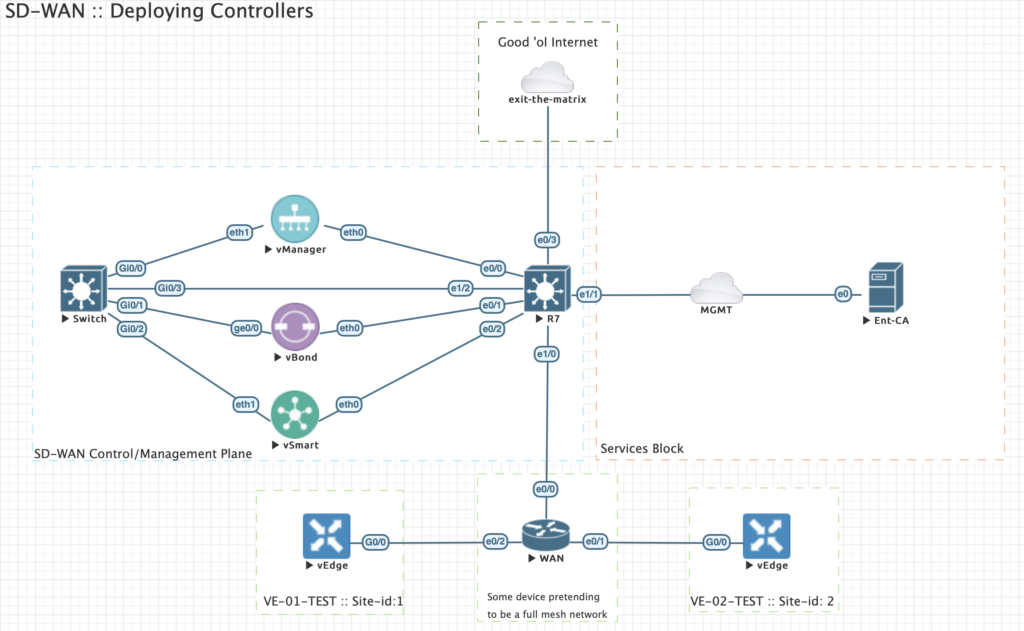
| Device | VPN0 | VPN512 | Interfaces VPN0 / VPN512 |
| vManage | 192.168.100.250/24 | 10.100.200.250/24 | eth1 / eth0 |
| vBond | 192.168.100.252/24 | 10.100.200.252/24 | ge0/0 / eth0 |
| vSmart | 192.168.100.251/24 | 10.100.200.251/24 | eth1 / eth0 |
Since I’m testing this lab thoroughly I have to reset all controllers first. You can do this by initiating the command below on each controller followed by a reboot of the device:
"request reset configuration"
:: Loading up the controller configurations
Building the base configurations for all controllers.
Note: Pay special attention to the fact that we do not configure the tunnel-interfaces for the overlay network yet. If you do then the communication between vManage and vBond most likely will fail.
vManage: system
system-ip 1.1.1.1
site-id 9000
organization-name testlab.local
vbond 192.168.100.252
!
vpn 0
no int eth0
! eth0 is by default connected to VPN0!
interface eth1
no tunnel-interface
description overlay_network
ip address 192.168.100.250/24
no shutdown
!
!
vpn 512
interface eth0
description management_network
ip address 10.100.200.250/24
no shutdown
!
commit and-quit
vBond: system
system-ip 1.1.1.2
host-name vbond
site-id 1000
organization-name testlab.local
vbond 192.168.100.252 local vbond-only
!
vpn 0
interface ge0/0
no tunnel-interface
description overlay_network
ip address 192.168.100.252/24
! needs to be disabled for registration. otherwise it will fail
no shutdown
!
!
vpn 512
interface eth0
description management_network
ip address 10.100.200.252/24
no shutdown
!
commit and-quit
Note: vBond is actually the same image as a vEdge. We convert the personality by initiating the “vBond {ip-address} local” command.
vSmart:
system
  system-ip 1.1.1.3
  site-id 9000
  organization-name testlab.local
  vbond 192.168.100.252
 !
 vpn 0
 no int eth0
  interface eth1
  no tunnel-interface
   description overlay_network
   ip address 192.168.100.251/24
   no shutdown
  !
 !
 vpn 512
  interface eth0
   description management_network
   ip address 10.100.200.251/24
   no shutdown
  !
  commit and-quit
vEdge 1:
 system
  system-ip 2.1.1.1
 site-id 1
   host-name VE-01-TEST
  organization-name testlab.local
  vbond 192.168.100.252
 !
 vpn 0
 ip route 0.0.0.0/0 192.168.1.2
  interface ge0/0
   no tunnel-interface
   description overlay_network
   ip address 192.168.1.1/24
   no shutdown
  !
 !
 vpn 512
  interface eth0
   ip dhcp-client
   no shutdown
  !
 commit and-quit
vEdge 2:
system
  system-ip 3.1.1.1
  site-id 2
  host-name VE-02-TEST
  organization-name testlab.local
  vbond 192.168.100.252
 !
 vpn 0
 ip route 0.0.0.0/0 192.168.2.2
  interface ge0/0
   no tunnel-interface
   description overlay_network
   ip address 192.168.2.1/24
   no shutdown
  !
 !
 vpn 512
  interface eth0
   ip dhcp-client
   no shutdown
  !
  commit and-quit
:: Installing certificates
I’ve setup a small linux Root CA. I will cover this in a separate topic.
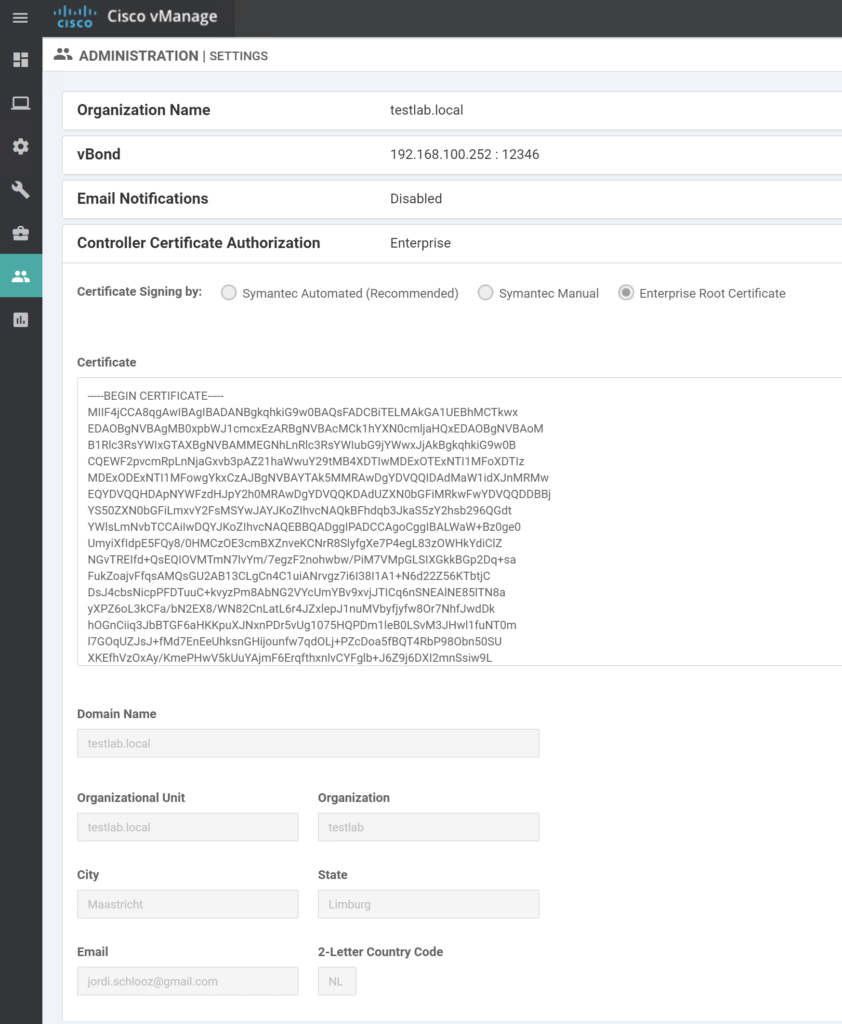
Go to Administration / Settings / Controller Certificate Authority.
Set CA to Enterprise Root CA and paste the root certificate into the certificate field
Here can also setup the Organization name and vBond IP address. These are essential for initial setup. Organization name is tied to all certificates for your CA.
Communication from Vmanage to vBond happens over VPN0.
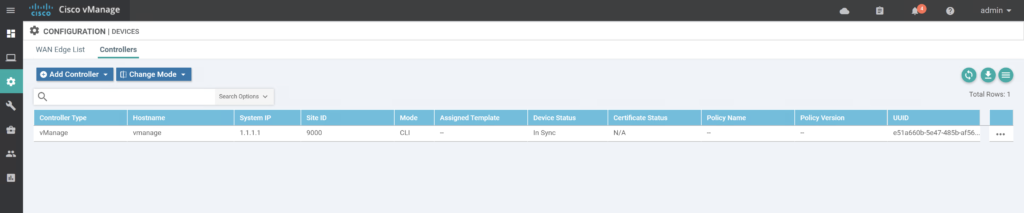
Check current Device list
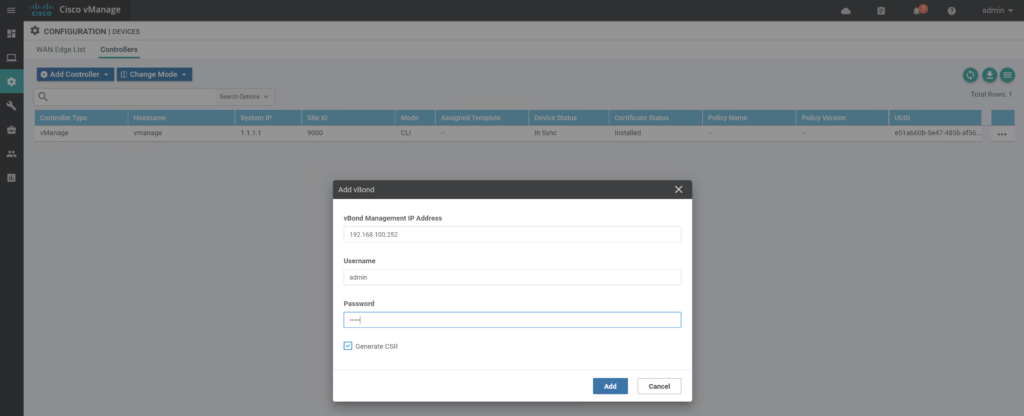
Go to Configuration / Devices / Controllers.
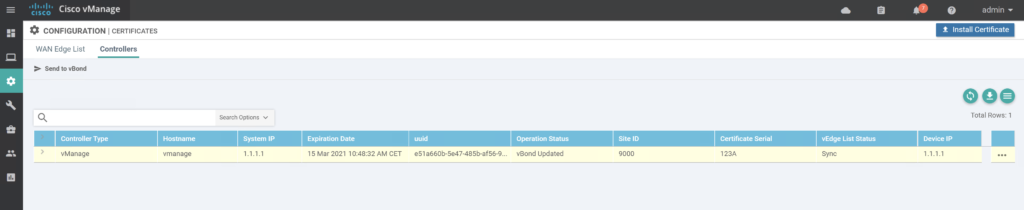
Go to Configuration / Certificates / Controllers.
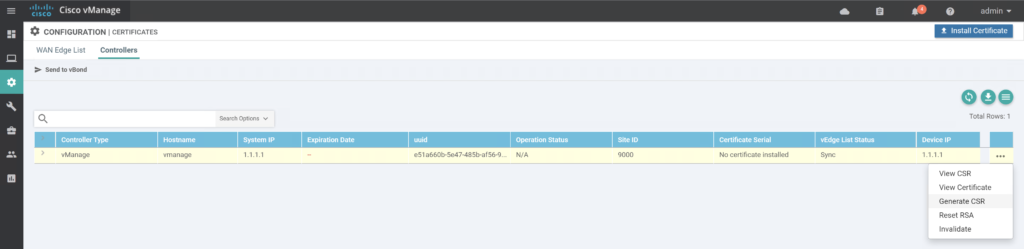
:: Sign CSR’s
Copy paste Certificate into your CA and sign the request by initiating:
root@ubuntu1804-pfne:~/ca/request# openssl ca -in vmanage.csr -out vmanage.pem
 Using configuration from /usr/lib/ssl/openssl.cnf
 Enter pass phrase for /root/ca/private/cakey.pem:
 Check that the request matches the signature
 Signature ok
 Certificate Details:
         Serial Number: 4666 (0x123a)
         Validity
             Not Before: Mar 15 09:48:32 2020 GMT
             Not After : Mar 15 09:48:32 2021 GMT
         Subject:
             countryName               = NL
             stateOrProvinceName       = Limburg
             organizationName          = testlab
             organizationalUnitName    = testlab.local
             commonName                = vmanage-e51a660b-5e47-485b-af56-9599109d061d-9.testlab.local
             emailAddress              = jordi.schlooz@gmail.com
         X509v3 extensions:
             X509v3 Basic Constraints:
                 CA:FALSE
             Netscape Comment:
                 OpenSSL Generated Certificate
             X509v3 Subject Key Identifier:
                 1D:0D:FF:20:04:EF:3E:76:A0:E3:65:EA:3D:A1:3C:D4:19:16:BE:D3
             X509v3 Authority Key Identifier:
                 keyid:C8:9A:4B:FA:13:1B:A7:6F:13:31:C5:57:92:20:EA:D0:18:9F:C0:33
Certificate is to be certified until Mar 15 09:48:32 2021 GMT (365 days)
 Sign the certificate? [y/n]:y
1 out of 1 certificate requests certified, commit? [y/n]y
 Write out database with 1 new entries
 Data Base Updated
:: Install signed certificates to vManage
Choose “install Certificate” in vManage.
Repeat the same procedure for vSmart and vBond:
:: Enabling controller communications
vManage
!
vpn 0
interface eth1
tunnel-interface
commit
end
!
vSmart:
!
vpn 0
interface eth1
tunnel-interface
commit
end
!
vBond:
!
vpn 0
interface ge0/0
tunnel-interface
encapsulation ipsec
commit
end
!
Please note that we do enable encapsulation ipsec on the vBond, but it’s not needed. The configuration of the device doesn’t allow us to commit without encapsulation enabled. This is probably due to the fact that this is essentially a vEdge device with personality set to vbond local. It expects to have encapsulation set on a tunnel-interface.
Example:
vbond# conf t
Entering configuration mode terminal
vbond(config)# vpn 0
vbond(config-vpn-0)# interface ge0/0
vbond(config-interface-ge0/0)# tunnel-interface
vbond(config-tunnel-interface)# commit
Aborted: too few 'vpn 0 interface ge0/0 tunnel-interface encapsulation', 0 configured, at least 1 must be configured
vbond(config-tunnel-interface)# encapsulation ipsec
vbond(config-tunnel-interface)# commit
Commit complete.
vbond(config-tunnel-interface)#
The vBond ensured everything is tied together via dtls tunnels:
vbond# show orchestrator connections
                                                                                      PEER                      PEER
          PEER     PEER     PEER             SITE        DOMAIN      PEER             PRIVATE  PEER             PUBLIC                                   ORGANIZATION
INSTANCE TYPE PROTOCOL SYSTEM IP ID ID PRIVATE IP PORT PUBLIC IP PORT REMOTE COLOR STATE NAME UPTIME
0        vsmart   dtls     1.1.1.3          1000        1           192.168.100.251  12346    192.168.100.251  12346   default          up              testlab.local           0:00:00:24
 0        vsmart   dtls     1.1.1.3          1000        1           192.168.100.251  12446    192.168.100.251  12446   default          up              testlab.local           0:00:00:23
 0        vmanage  dtls     1.1.1.1          9000        0           192.168.100.250  12346    192.168.100.250  12346   default          up              testlab.local           0:00:00:33
 0        vmanage  dtls     1.1.1.1          9000        0           192.168.100.250  12446    192.168.100.250  12446   default          up              testlab.local           0:00:00:32
 0        vmanage  dtls     1.1.1.1          9000        0           192.168.100.250  12546    192.168.100.250  12546   default          up              testlab.local           0:00:00:34
 0        vmanage  dtls     1.1.1.1          9000        0           192.168.100.250  12646    192.168.100.250  12646   default          up              testlab.local           0:00:00:35
I will run through installing vEdges in another topic as this procedure requires a Smart account from Cisco which I currently do not have. In the current release you need a Viptela serial file generated from a Smart account in order to register these devices in your SD-WAN setup.
:: REFERENCES
- SD-WAN | EVE-NG Lab files :: https://github.com/jschlooz/SD-WAN
- Viptela Documentation :: https://sdwan-docs.cisco.com/Product_Documentation
If the answer you’re looking for is not 42, please leave a comment. 🙂
This is one of the best lab setups ever explained, I will try this setup and post my further comments. Thank you SO much!
Glad you like and find it usefull.
I have really enjoyed this post. Can you please share with us ow to setup the CA server.?
Glad you enjoyed it. CA is pretty easy. I’ll see if I can find some time to create a small post about it.